SHAREfactory Wiki
Advertisement
SHAREfactory™_2.00_Photo_Editor_Walkthrough_(PS4)-0

SHAREfactory™ 2.00 Photo Editor Walkthrough (PS4)-0

SHAREfactory™ version 2.00 introduces the new Photo Editor. This mode allows editors to compile collages of their screenshots and photos from the Capture Gallery. Below lists the different functionalities you'll find in SHAREfactory's Photo Editor. You can also view this tutorial video for full details.

Remember That Time in Panama
Greetings from Abroad
Uncharted 4 Comic
Courtesy Modiviational

Remember That Time in Panama

SHAREfactory Photo Editor

Greetings from Abroad

SHAREfactory Photo Editor

Uncharted 4 Comic

SHAREfactory Photo Editor

Courtesy Modiviational

SHAREfactory Photo Editor

Remember That Time in Panama
Greetings from Abroad
Uncharted 4 Comic
Courtesy Modiviational


Starting a Photo Project[]


Photo front-end

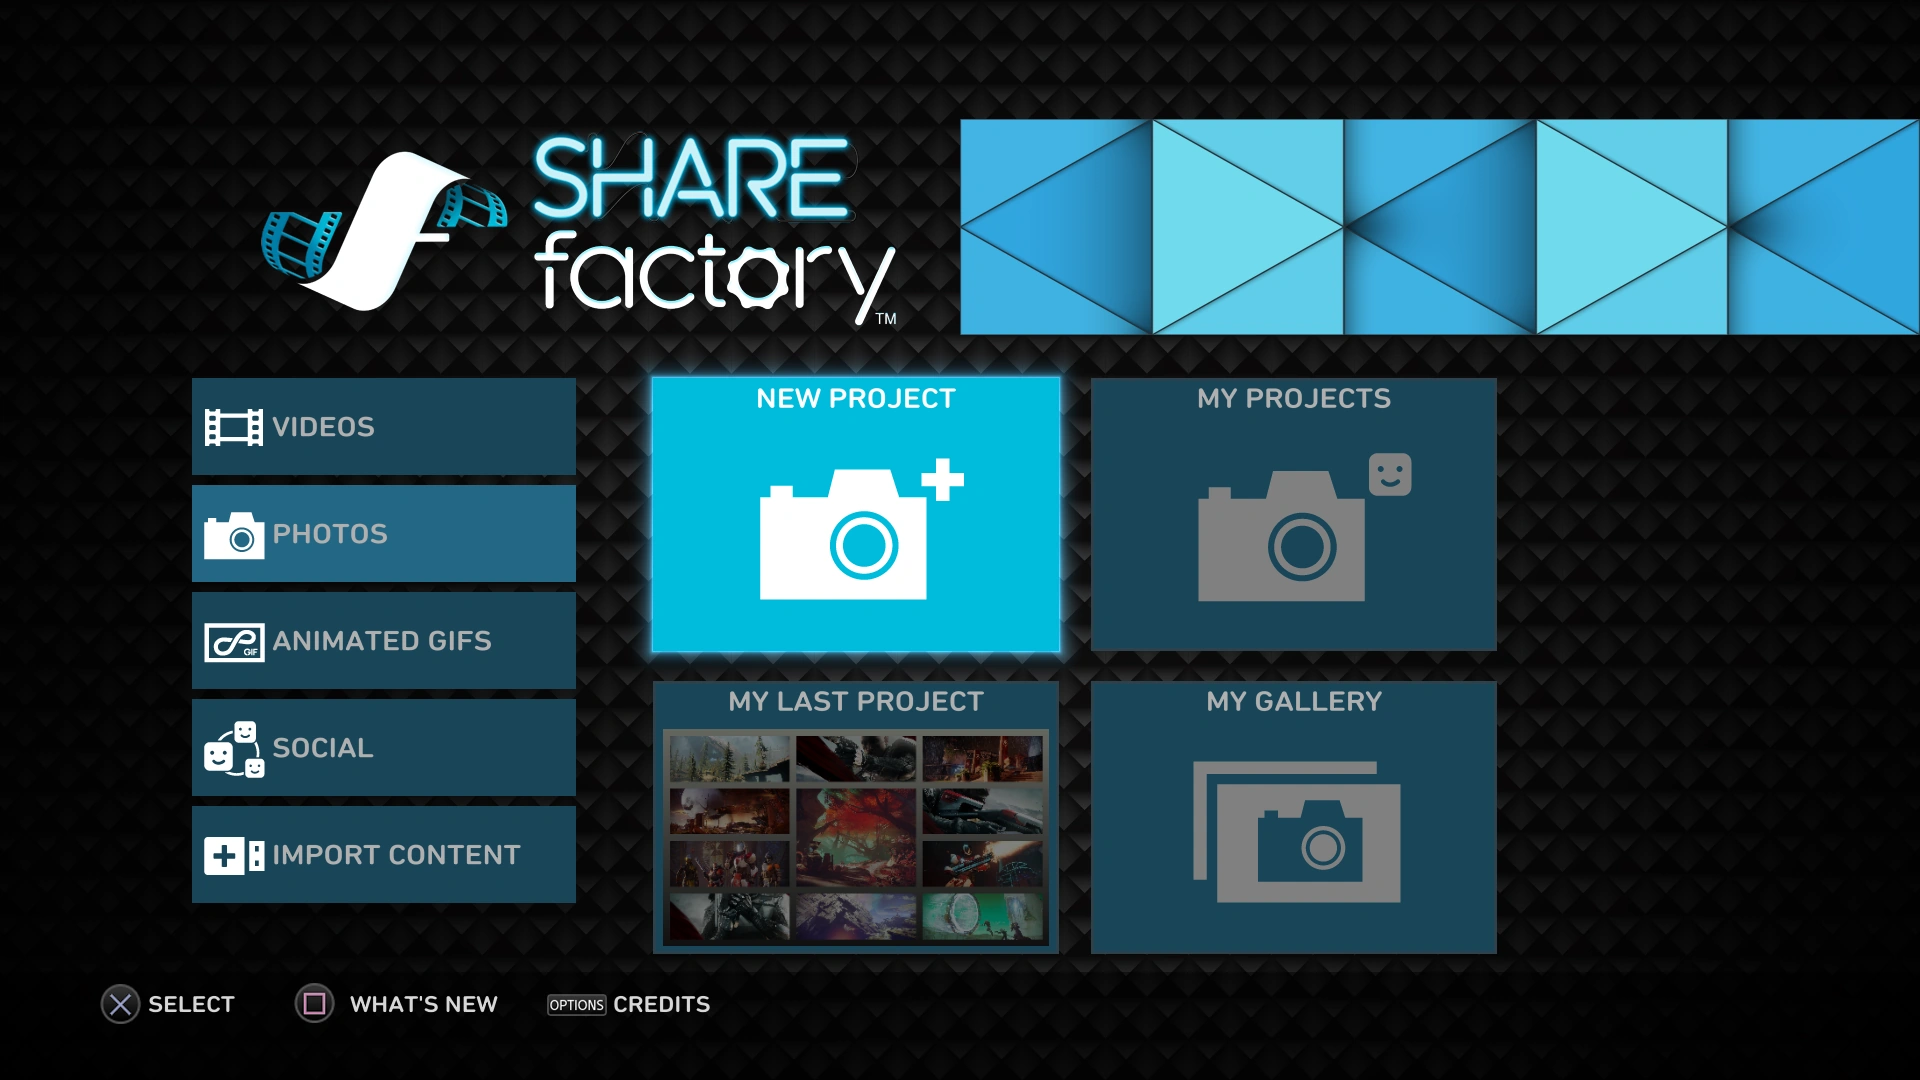
The Photo Editor allows editors to create collages with up to 16 different photos.

From the font-end menu, select Photos. Just as with Film Projects, you can create a New Project, open a Saved Project, or Edit your Last Project, or view a Gallery of your past Exported Photos.

Just as with Film Projects, start a New Photo Project by selecting a Theme. All of the internal and DLC SHAREfactory Themes remain available in Photo Projects.

Finally, select the Screenshots you want to use in your Photo Project. You can use between 1 and 16 Photos in a single Photo Project.


Basic Functionality[]


Once you enter the Photo Editor, the following options become available:

Frame Layout[]


Frames

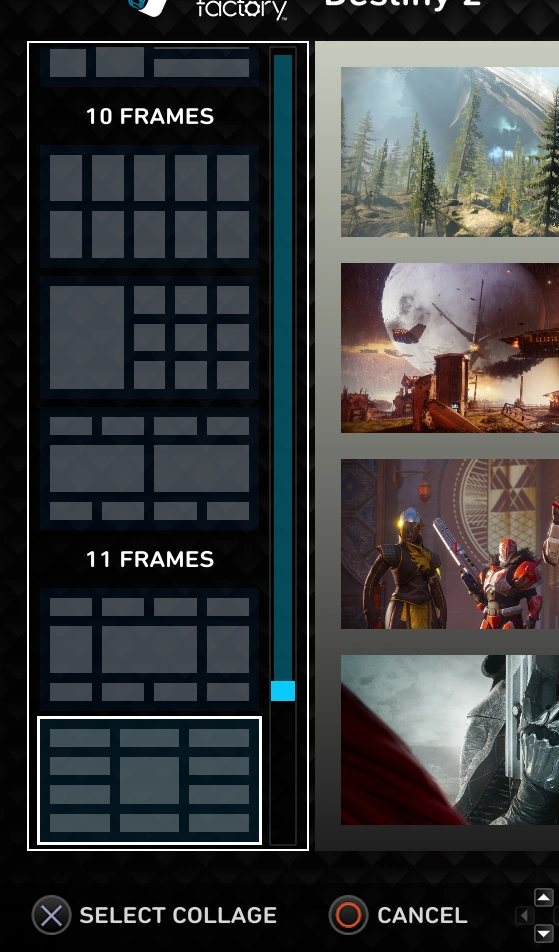
Your collages can have frames from 1-16 photos and 1 background image.

Use the D pad to navigate between the various Photo Frames of your collage. You can edit any frame highlighted, or highlight the Frames layout panel on the left side of the screen to change the layout of your collage, or add/remove frames from your collage. You'll be able to find additional information on editing each frame below.


Editing Category Options[]


Editing Photo Projects is separated into 2 sections and 1 settings menu:

  • X Edit Photo include options to edit the highlighted Photo Frame.

  • SQUARE Edit Background can modify the borders and background of the overall image.

  • OPTIONS Options includes many of the same options found in Film Projects. Export Settings allows you to save your Photo Collage Export as a JPG or PNG in the Capture Gallery.

  • TRIANGLE1 Save exports your Photo Collage to the Capture Gallery and allows for sharing to Facebook, Twitter, PSN Messages, PSN Communities, or PSN Activities.


Edit Photo Options[]


EditPhoto

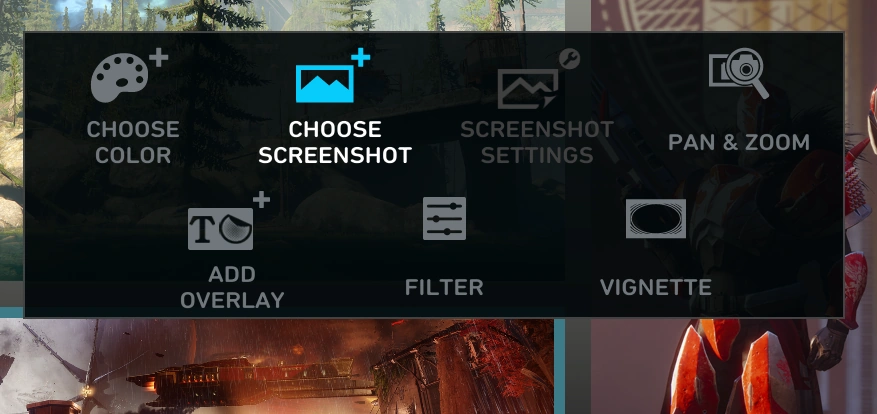
Edit Photo edits the highlighted frame of your collage.

Below lists the primary editing options for Photo Frames in the X Edit Photo menu:

  • Choose Color changes the frame to a solid color, selected with the Color Picker

  • Choose Screenshot changes the frame to any Capture Gallery Screenshot or Theme Art available in the Choose Screenshot menu. You can also add a GRADIENT screenshot.

  • Screenshot Settings open when a GRADIENT is used in a Photo Frame. This allows you to change the two colors used, as well as the angle of the GRADIENT.

  • Pan & Zoom allows you to Zoom into the photo with LeftAnalog and Pan the photo with the RightAnalog.

  • Add Overlay mirrors the same functionality of Film Projects with Stickers and Text. Overlays can be applied over the entire Photo and are not limited to each frame.

  • Filters applies the same Filter options found in Film Projects, with additional Filter Settings for those with additional options.

  • Vignettes add the various Vignette Layouts from Film Projects, with additional Layout Settings for those with extra options.


Edit Background Options[]


EditBackground

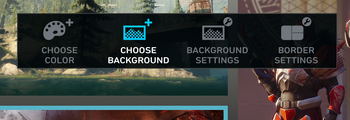
Edit Background modifies your collage's background and border settings.

The following lists the editing functions for SQUARE Edit Background:

  • Choose Color changes the border color of the entire project.

  • Choose Background inserts any Capture Gallery Screenshot or Theme Art found in the Choose Screenshot menu. Custom GRADIENT Screenshots are also available for Background images.

  • Background Settings modifies a GRADIENT Screenshot's settings when used, allowing editors to change the colors and angle of the GRADIENT.

  • Border Settings changes the Spacing and Roundness between Photo Frames.


Exports on PS4 vs. PS4 Pro[]


Exports from Photo Projects can change based on whether you are editing on a PS4 or PS4 Pro.

  • PS4 Photo exports are produced at 1080p, or 1920 x 1080.
  • PS4 Pro exports photo projects at 4K, or 3840 x 2160.


Advertisement